
The Complete Owner's Guide to Garage Storage Lifts: Before You Buy, During Installation, and Beyond
A garage storage lift is one of those purchases that rewards the homeowners who go in prepared and frustrates the ones who don't. Done right, it transforms the ceiling of your garage into genuinely usable storage that you'll access without a second thought. Done carelessly — wrong placement, underestimated load, installation shortcuts — it becomes an expensive ceiling decoration that you work around rather than with.
This guide is written for the homeowner who's already leaning toward a garage storage lift system and wants to get it right from start to finish. We'll cover the questions worth asking before you order, the realities of installation day, how to load and use the system correctly, and how to keep it performing well for years. Think of it as the manual the box doesn't include.
Phase 1: Before You Order — The Questions That Matter
The most common garage storage lift mistakes happen before a single bolt goes into the ceiling. Spending time on these questions up front prevents expensive and frustrating do-overs.
What ceiling height do you actually have — and where?
Ceiling height sounds like a simple measurement, but it's the one that trips up more installations than any other. The number that matters isn't the height at the middle of the garage or what the original builder's specification says — it's the height in the exact zone where you plan to install the lift, measured from the finished floor to the underside of the ceiling framing.
Measure in at least four spots within your planned installation zone. Garage floors are not always perfectly level, and ceiling heights can vary across the same bay, particularly near exterior walls where the ceiling may follow the roofline. A difference of even four inches can determine whether a given lift system will work for your space or leave the platform at an awkward height when fully lowered.
Once you have your actual ceiling height, cross-reference it against the lift's minimum ceiling requirement and its drop distance. The math is simple: your ceiling height minus the drop distance equals where the platform will sit when fully lowered. If that number is above your comfortable working height, the system won't function the way you need it to.
What is your ceiling framing, exactly?
There are two main types of ceiling framing in residential garages, and they have meaningfully different implications for how a storage lift gets installed.
Traditional dimensional lumber joists — typically 2x6 or 2x8 boards running parallel across the ceiling — are the gold standard for overhead storage installation. Lag screws driven directly into these joists create extremely strong, reliable anchor points. If your garage has this type of framing, installation is straightforward.
Engineered roof trusses — the triangulated assemblies common in homes built after roughly the mid-1980s — are structurally different and require more care. The bottom chord of a truss can handle vertical load, but the internal members are not designed to carry the same loads. Anchoring to a truss bottom chord with appropriate hardware works, but anchoring to a truss web member does not. If you have trusses, read the installation documentation carefully and follow it precisely — don't assume that because it's wood framing, any lag screw placement will work.
Where are your garage door components, and how will you work around them?
The garage door opener rail runs down the center of the ceiling from the door header to roughly the midpoint of the garage. The horizontal tracks run along both side walls near the ceiling. These are fixed constraints that your lift placement must account for.
Sketch a rough ceiling plan — even just on paper — showing the opener rail, both tracks, any light fixtures or HVAC vents, and the approximate joist direction. Then sketch in where the lift platform would need to sit. The platform needs clear space around it both when raised (to avoid contact with door hardware when the door cycles) and when lowered (to give you working room to load and unload).
Don't assume you can eyeball this. Many installations that seemed fine in planning turn out to have the platform in the path of the garage door track or the opener trolley. Measure it out explicitly.
What will you actually load onto it — weighed, not estimated?
Most homeowners significantly underestimate the cumulative weight of what they plan to store. Holiday decorations seem light until you count the bins: a typical household's worth of Christmas decorations can easily run 8-10 standard totes at 15-25 lbs each. Add camping gear, sports equipment, and seasonal clothing storage, and a "light" overhead load can top 200-300 lbs without much effort.
Before settling on a lift system's capacity, physically weigh or conservatively estimate the total load you intend to put on the platform. Then choose a system whose rated capacity is comfortably above that number — not right at the limit. A garage storage lift rack at 80% of rated capacity will serve you safely for many years. One that's consistently loaded to 95-100% of its rating is being asked to work harder than it was designed to.

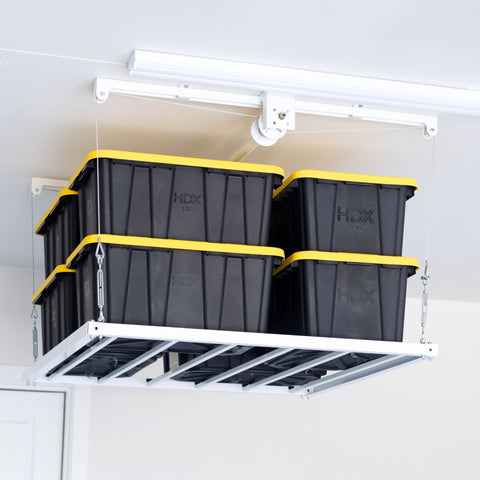
Ceiling SAM's retractable garage storage lifts — the 4x4, 4x6, and 4x8 Retractable Garage Storage Lifts — are each rated at 400 lbs of distributed weight, which covers the realistic storage needs of most households with comfortable margin. For heavier loads or larger platforms, the drill-powered 4x8 Storage Elevator Pro handles up to 700 lbs and accommodates ceiling heights from 8 to 14 feet.
DIY installation or professional?
Garage storage lift installation is within reach of a capable, patient DIYer — but it's more involved than hanging a shelf, and the consequences of getting it wrong are more serious. You're anchoring a system that will carry hundreds of pounds overhead, potentially above parked vehicles and people.
Be realistic about your comfort level with structural anchoring, working overhead, and reading technical installation documentation. If you have any genuine uncertainty about your ceiling structure, your anchoring points, or your ability to get the system level and aligned correctly, professional installation is a straightforward and worthwhile call. Ceiling SAM has a network of professional installers who can handle the job correctly and efficiently — the cost of professional installation is modest compared to the total system investment and the peace of mind it buys.
Phase 2: Installation Day — What to Expect and How to Get It Right
If you're handling installation yourself, the following sequence and principles will give you the best chance of a clean, safe result.

Gather everything before you start
Read the full installation manual before touching a tool. Lay out all hardware components and verify nothing is missing. Have a helper available — overhead installations that require holding components in position while fastening are genuinely two-person jobs, and trying to rush them solo leads to misaligned hardware and stripped screws. Make sure you have a reliable drill, appropriate bit sizes, a long level, a measuring tape, and a quality stud finder.
Mark your joist locations precisely
Use your stud finder to locate joists and mark their centers clearly — on the ceiling itself, not just on a piece of tape you'll lose. Verify each joist location by probing with a small finish nail before committing to a lag screw. Stud finders can give false positives, particularly near electrical wiring or on older ceilings with inconsistent density.
Dry-fit before fastening
Position all mounting hardware in place without driving fasteners, and verify that the planned layout actually works: the mounting points align with joists, the platform will be level, and there's adequate clearance from garage door hardware on all sides. Adjust before you drill, not after. This step feels slow but eliminates the most common installation errors entirely.
Pre-drill pilot holes
Pre-drilling into ceiling joists makes lag screw installation cleaner and significantly reduces the risk of splitting the wood. Use the correct pilot hole diameter for the lag screw size specified in the installation manual. A slightly undersized pilot hole is better than an oversized one — you want the threads to bite, not spin.
Get the platform level — before calling it done
A storage lift platform that isn't level will cause stored items to shift and slide, put uneven stress on the lift mechanism, and look visibly wrong from the moment you lower it the first time. Most lift systems have adjustment provisions built in — use them. Check level in both directions (side-to-side and front-to-back) with a long level, not just by eye.
Test under graduated load
Before loading the platform with its full intended cargo, test it under graduated load: raise and lower it empty several times to confirm smooth operation, then add 25% of your intended load, test again, then 50%, then 75%, then full load. This graduated approach lets you identify any binding, misalignment, or hardware issues at a stage where they're easy to address — before the system is fully loaded and something goes wrong unexpectedly.
Phase 3: Loading and Using Your Garage Storage Lift System
A garage lifting system that's been correctly installed still needs to be used correctly to perform well long-term. These practices will keep the system running smoothly and your stored items genuinely organized.
Load from the center out, heavy items in the middle
Weight distribution on a storage lift rack matters more than on a fixed shelf. An off-center load — particularly a heavy concentration toward one corner — creates uneven tension on the lift cables or straps, which causes the platform to hang unevenly and stresses the mechanism asymmetrically over time. Place heavier items toward the center of the platform and distribute weight as evenly as possible across its footprint.
Never exceed the rated capacity — and know what you've loaded
This deserves direct emphasis. Overhead storage lift systems have rated capacities that are engineering limits, not marketing suggestions. Exceeding the rated capacity doesn't just risk damaging the mechanism — it risks a sudden failure above your vehicles, your tools, and potentially your family. Know what's on the platform. If you're unsure whether you're within the limit, weigh it.
Secure items before raising
Before raising the platform after loading, make sure nothing can shift, tip, or slide off during the lift cycle. Bins should have lids secured. Nothing should overhang the edges of the platform in a way that could catch on garage door tracks or other ceiling fixtures as the platform rises. A falling bin from overhead height causes real damage.
Lower fully before loading or unloading
Always lower the platform to its full down position before reaching for items. Reaching up to a partially-lowered platform defeats the entire point of the lift system and creates unnecessary risk. The whole value of an overhead garage storage lift is that it comes to you — use that capability fully every time.
Organize with the same logic as any storage system
Items you access more frequently belong toward the outer edges of the platform where they're easier to reach when the platform is lowered. Items you access rarely can go toward the center or back. Group by season or use category so retrieval is intuitive — camping gear together, holiday bins together, sports equipment by sport. Label bins on multiple sides so they're readable regardless of which direction they're facing when the platform comes down.
Phase 4: Long-Term Ownership — Keeping Your Lift System in Top Shape
A well-installed garage storage lift system should provide years of reliable service, but like any mechanical system it benefits from periodic attention.
Quarterly visual inspection
Every few months, lower the platform fully and take a few minutes to inspect the whole system. Look at the mounting hardware — any lag screws that have worked slightly loose, any visible cracking in the wood around anchor points. Check the cables, straps, or mechanical components of the lift mechanism for wear, fraying, or unusual deformation. Inspect the platform frame itself for any signs of bending or distortion. Early detection of small issues prevents them from becoming large ones.
Annual fastener check and tightening
Seasonal temperature swings cause thermal expansion and contraction in both the garage framing and the lift hardware, which can gradually loosen fasteners over time. Once a year, with the platform fully raised and unloaded, check all lag screws and structural bolts and snug anything that has developed any movement. A quarter-turn on a lag screw that's begun to work loose is a five-minute task. Ignoring it until it fails is not.
Lubricate moving components as needed
Drill-powered and motorized lift systems have mechanical components — gears, drive shafts, pulleys, or cable guides — that benefit from periodic lubrication. Consult the manufacturer's recommendations for your specific system and apply appropriate lubricant to the moving components at the intervals they specify. A system that operates smoothly and quietly is a system that's lasting. One that develops grinding, squealing, or unusual resistance during operation is telling you something needs attention.
Rebalance the load when contents change
Every time you significantly change what's stored on the platform — rotating out a full season's worth of gear, adding new items, removing old ones — take a moment to recheck the weight distribution. An uneven load that develops gradually over multiple storage rotations is easy to overlook until the platform starts hanging noticeably crooked or the lift mechanism starts laboring unevenly.
Fitting Your Garage Storage Lift into a Complete Overhead System
The homeowners who get the most out of a garage storage lift are usually the ones who treat it as part of a broader ceiling organization strategy rather than a standalone solution.
A practical and common approach: use the retractable lift for the gear you rotate through most frequently — the camping bins that come out every trip, the sports equipment that cycles with the seasons, the tools and supplies you access monthly. Reserve a fixed ceiling rack in another zone for items that genuinely sit untouched for six to twelve months at a time, where a ladder trip once or twice a year is a perfectly acceptable trade-off.
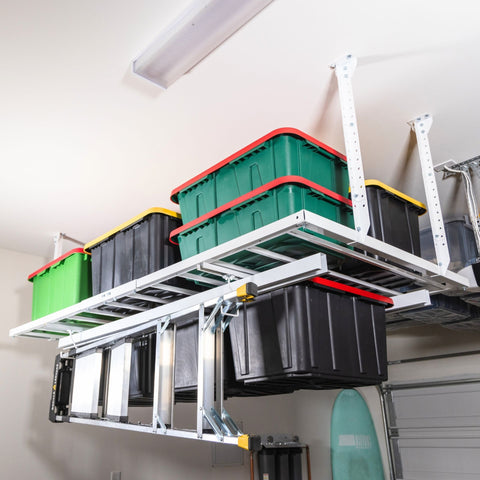
Ceiling SAM's heavy-duty ceiling storage racks complement the retractable lift lineup well in exactly this configuration. Add a Bin Slide or Tote Slide to the fixed rack and even the rarely-accessed overhead storage becomes easy to navigate without a ladder. The 3-in-1 Storage System takes this concept further, combining a 4x8 heavy-duty rack with an integrated Tote Slide in a single installation — a cohesive overhead storage solution that handles both long-term and accessible storage simultaneously.
The ceiling of your garage can do a lot of work if you let it. A storage lift handles the active layer; fixed racks handle the archive layer. Together they create an overhead system where virtually nothing needs to live on the floor — and where the whole garage finally functions the way it should.
Final Thoughts
A garage storage lift is one of those purchases where preparation is the difference between a system that performs exactly as expected and one that causes constant frustration. The homeowners who measure carefully, choose the right system for their ceiling height and load requirements, install it properly, and use it correctly consistently report that it's among the best garage upgrades they've made.
The lift doesn't just store things — it changes how overhead storage feels to use. When accessing your gear doesn't require a ladder, doesn't require careful balancing with heavy bins overhead, and doesn't require involving a second person for safety, you actually use the storage system. And a storage system you actually use is one that keeps your garage organized rather than slowly filling back up with floor clutter.
Explore Ceiling SAM's complete range of overhead garage storage lifts to find the right system for your ceiling height, load requirements, and how your household uses the garage. And if you're building out the full ceiling layer, the heavy-duty ceiling storage rack lineup is the natural companion to pair with it.
Questions about your garage? Real people, fast answers.
Call or text(480) 720-0593