

Bicycle Hooks for Every Space: Your NoBicycle Hooks for Every Space-Nonsense Guide to Storing Bikes on the Wall
If you've ever tripped over a bike in your garage, squeezed past one in a hallway, or spent five minutes untangling two bikes that were propped against each other, you already know the problem. Bicycles are genuinely difficult to store well — they're too large for most shelves, too oddly shaped to stack, and heavy enough to cause real damage when they tip.
The solution most people eventually land on is a bicycle hook — a wall-mounted anchor point that lifts the bike off the floor and keeps it out of the way until you need it again. It sounds simple, and in many cases it is. But there's more nuance to choosing and using bicycle hooks for walls than it might seem, especially once you factor in bike type, wall material, number of bikes, and how often you actually ride.
This guide breaks down everything worth knowing about bicycle hanging hooks and wall storage, from the basics of how they work to practical advice on getting the most out of your setup.
What Is a Bicycle Hook, and How Does It Work?
At its most basic, a bicycle hook is a shaped piece of hardware — usually steel with a rubber or plastic coating — that screws or bolts into a wall surface. You hang the bike on the hook by lifting one or both wheels onto it, and the bike's weight holds it in place.
The geometry varies depending on the style. Some bicycle hooks for walls are a single J-shaped arm that holds one wheel; others are padded horizontal bars that cradle the frame at the top tube. Some are designed to hold the bike horizontally so it hangs parallel to the wall, while others hold it vertically so it hangs perpendicular, taking up less horizontal space.
What they all have in common is the core benefit: the bike comes off the floor, reduces its footprint from roughly 6 square feet to almost nothing, and stays secure until you pull it down.
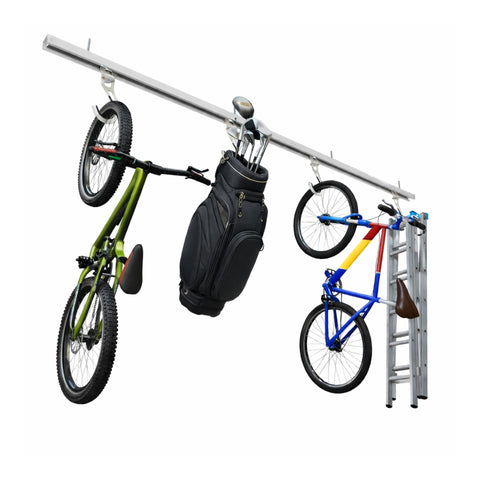
Bicycle Hooks for Wall: The Main Styles Explained
Knowing which style of bicycle wall hook fits your situation will save you a lot of trial and error. Here's a breakdown of the most common types and where each one works best.
The Classic J-Hook (Wheel Hang)
This is the most widely available and affordable style. A single J-shaped hook mounts to the wall at a fixed height, and you hang the bike by lifting the front or rear wheel onto it. The bike hangs horizontally with its wheel on the hook and the rest of the frame angled away from the wall.
It works, but it has limitations. Over time, hanging a bike by its wheel rim puts stress on the rim and spokes — not ideal for expensive bikes or frequent daily hangers. The bike also tends to swing and shift, which can mean scuffs on the wall or tangled handlebars if multiple bikes are stored nearby. Best for occasional storage of sturdy bikes with standard wheel sizes.
Horizontal Frame Cradle
A frame cradle mount supports the bike at its top tube rather than by the wheel. Padded arms or a curved bar hold the frame level, distributing weight across the sturdiest part of the bike. This is gentler on the bike and holds it more securely against the wall.
Frame cradles are a popular choice for riders who care about their bikes' longevity — road cyclists, mountain bikers with carbon frames, or anyone with a high-value bike they don't want to put unnecessary stress on. The trade-off is that they require more precise positioning to hang the bike cleanly, especially on heavier bikes.
Vertical Bicycle Wall Hook
A vertical bicycle wall hook holds the front wheel pointing straight up, with the bike hanging down alongside the wall. The footprint is narrow — typically less than 12 inches wide — which makes this the most space-efficient option per bike when you have limited wall width but enough vertical clearance.
The main practical consideration is the weight of the bike. Lifting a 30-pound mountain bike straight above shoulder height and hooking the front wheel onto a wall mount is manageable for most adults, but can be awkward or challenging for heavier bikes, kids, or older riders. If ease of access is a priority, this style may not be ideal for daily use.
Folding and Swing-Arm Mounts
Folding bike wall hooks and swing-arm mounts are designed to fold flat against the wall when not in use, minimizing visual clutter and reclaiming the space around the mount. When you need to hang or retrieve a bike, the arm swings out and locks in place.
These are particularly useful in shared spaces, apartments, or garages where a fixed-arm hook sticking out would block traffic flow or interfere with parked cars. The extra mechanical complexity means a slightly higher price point, but the practicality in tight spaces often justifies it.
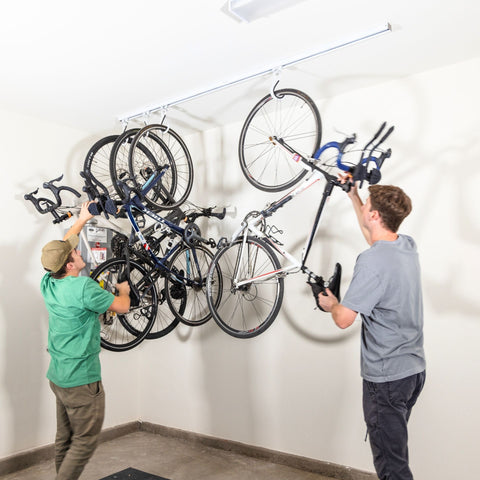
Ceiling-Mounted Sliding Bicycle Storage
While not a wall hook in the traditional sense, ceiling-mounted sliding systems are worth understanding as an alternative — especially for garages where wall space is already in use or where you need to store multiple bikes efficiently.
Ceiling SAM's Bike Slide and Bike Slide Pro mount directly to garage ceiling joists and use a sliding track system that keeps bikes stored overhead. Each bike sits in its own slot on the track and can be accessed independently — no lifting one bike out of the way to reach another. For households with two, three, or four bikes to store, this kind of ceiling system often does a cleaner job than a row of bicycle hooks for walls, and it frees up wall space entirely for other storage uses.
Choosing the Right Bicycle Wall Hook: Six Questions to Ask Yourself
Before buying any bicycle hanging hook or wall storage system, it helps to work through a few practical questions.
1. How heavy is the bike?
This is the most important factor. A lightweight road bike at 18 lbs is very different from a full-suspension e-bike at 55 lbs. Check the weight rating of any hook carefully and leave yourself a margin — a hook rated to 35 lbs is not the right call for a 33-lb bike used daily.
2. What is the wall made of?
A drywall stud mount is fine for lighter bikes and lower-frequency access. Masonry walls (concrete, brick, or block) require masonry anchors and a hammer drill. Wood-framed walls with exposed studs — common in garages — give you the most straightforward and secure mounting option for nearly any hook style.
3. How often will you access the bike?
A bike you ride every day needs to be easy to hang and unhook without a production. A vertical bicycle wall hook that requires a clean overhead lift is fine for a seasonal bike you access a handful of times a year, but may get frustrating fast for a daily commuter bike.
4. How many bikes are you storing?
One bike is simple. Two bikes requires planning hook placement so frames and handlebars don't interfere. Three or four bikes on hooks demands careful spacing, staggered heights, or a dedicated multi-bike system. At that point, a ceiling-mounted solution often becomes the more practical choice.
5. Do you need the wall space for anything else?
Bike hooks for walls occupy real estate that could otherwise hold shelving, pegboards, tool organizers, or other storage. Think about whether committing that wall space to bikes is the right call, or whether moving bikes to the ceiling would be a better use of the available surfaces.
6. What type of bikes are you storing?
Standard diamond-frame bikes work with most hook styles. Kids' bikes, step-through frames, cargo bikes, and fat-tire bikes all have quirks that some hooks can't accommodate. If you have a mix, look for hooks or systems flexible enough to handle all of them.
Bicycle Hook Installation: Getting It Right the First Time
Most bicycle hooks for walls are DIY-friendly installations, but a few fundamentals make the difference between a solid, long-lasting mount and one that wobbles, pulls out, or scratches your wall.
Anchor Into Structure — Not Just Drywall
This cannot be overstated. Drywall alone cannot reliably support the weight of a bicycle over time, especially with the leverage that comes from a bike hanging out from the wall. Locate wall studs with a stud finder and anchor your hook hardware directly into them. In a garage with unfinished walls, mounting directly to exposed studs or a plywood backer is even better.
If your wall layout genuinely doesn't allow stud mounting — for example, the right spot for the hook falls between two studs — use heavy-duty toggle bolts rated well above the bike's weight, and accept that this is a compromise solution rather than an ideal one.
Height and Clearance Planning
Mark out where the bike will actually sit before drilling anything. Stand the bike up next to the wall and measure how high the hook needs to be. Account for the full horizontal projection of the bike — handlebars, pedals, and rear derailleur all extend beyond the frame. For horizontal mounts, the bike will project 18 to 28+ inches from the wall depending on frame size; make sure there's nothing in that space that will interfere.
Spacing Multiple Hooks Correctly
If you're installing multiple cycle wall mount hooks in a row, give each bike a minimum of 18-20 inches of horizontal clearance. Better yet, stagger the heights slightly — alternating one hook high and one slightly lower — so that handlebars from adjacent bikes don't overlap. Measure with the actual bikes in place before marking holes for the second and third hooks.
Test the Mount Before Loading It
After installation, grip the hook and apply firm pressure in the direction a loaded bike would create: downward and outward. There should be zero movement. Any flex or creaking means the anchor isn't seated properly. Fix it before you hang the bike, not after.
Protecting Your Bike When Using Wall Hooks
The best bicycle hanging hook is one that holds your bike without damaging it. A few easy steps will protect your bike's finish and mechanical components during storage.
Use rubber-coated or foam-padded hooks. Any hook that contacts a painted frame, rim, or fork should have a soft coating. Bare metal hooks will eventually scratch or chip finishes, especially if the bike moves around on the hook.
Don't hang by the derailleur side. When choosing which wheel to hang a J-hook bike on, always use the side away from the derailleur. The derailleur is a precision component that doesn't respond well to being the load-bearing contact point.
Check tire pressure before extended storage. A bike hanging by its wheel for months can slowly lose tire pressure. Check and top up tires every few weeks if the bike is in long-term storage.
Keep cables and brake lines free. When hanging the bike, make sure brake and shift cables aren't getting kinked, pinched, or resting under tension. Kinked cables can cause shifting and braking issues over time.
When Wall Hooks Aren't Enough: Scaling Up Your Bike Storage
Wall hooks are a great starting point, but there are situations where they hit their limits — and knowing when to scale up saves a lot of frustration.
If you find yourself constantly moving one bike to access another, you've outgrown a simple hook setup. If your wall space is so covered with bikes that there's no room left for anything else, you've outgrown a simple hook setup. If kids are struggling to reach their bikes on wall-hung hooks, or if e-bikes have become too heavy to lift conveniently, you've outgrown a simple hook setup.
At that point, a ceiling sliding system like the Ceiling SAM Bike Slide or Bike Slide Pro is worth a serious look. These systems store bikes overhead on a track — each bike accessible independently, no wall space consumed, and no lifting straight up required. You slide the bike along the track rather than hoisting it, which makes access easier and more practical for everyday riders.
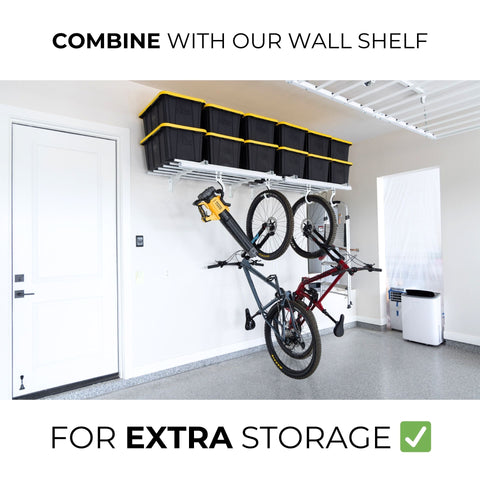
They also integrate cleanly with the rest of a garage storage system. If you're already using ceiling racks or retractable storage lifts for bins and seasonal gear, a ceiling bike system extends that same overhead approach to your bicycles — giving the whole garage a cohesive, organized feel rather than a patchwork of mismatched solutions.
Putting It All Together: A Simple Framework for Deciding
Here's a quick decision framework based on common scenarios:
One bike, occasional use, limited budget → A single J-hook or frame cradle mounted to a wall stud. Simple, effective, cheap.
One or two bikes, daily riders, care about the bike → A padded frame cradle or quality folding wall mount. Easier access, gentler on the bike.
Two or three bikes, family garage, moderate wall space → Staggered bicycle hooks for wall, carefully spaced. Budget-friendly but requires planning.
Three or more bikes, OR limited wall space, OR daily access needed → Ceiling-mounted sliding system. Frees up walls, handles multiple bikes independently, easier daily retrieval.
Multiple bikes PLUS bins, tools, and other garage gear → Ceiling system for bikes paired with overhead rack storage for everything else. Keeps the garage genuinely organized rather than just less cluttered.
Final Thoughts
A bicycle hook is a small investment with a genuinely big impact on how livable your garage or storage space feels. Getting a bike off the floor is one of those changes that immediately makes a space feel more organized, more spacious, and more functional — even before you tackle anything else.
The right type of bicycle wall hook depends on your specific situation: how many bikes, how heavy, how often you ride, and what else your walls need to do. For simple setups, a well-chosen wall hook is all you need. For bigger households or garages that need to do more, it's worth thinking about ceiling storage as the more scalable long-term solution.
Explore Ceiling SAM's bicycle storage options — including the Bike Slide and Bike Slide Pro — to see what fits your garage. And if you're ready to organize the whole space, the full range of ceiling storage systems and wall storage solutions are worth exploring alongside it.